In the last few weeks I completed the purfling on both the top and back. I also completed carving the F holes. They look ok. I think they could be better with some practice. The bass bar was also added to the top.
Below are some clamps I made to hold the bassbar while gueing.
This is a shot of the attached bassbar.
My Blog on building my first Acoustic Guitar and Tenor Ukulele.. and whatever other instrument hits my fancy.... and as of mid 2011 also a Viola
Acoustic Guitar
This is my blog on building an acoustic guitar that my wife got me as a kit. Some of the parts came preassembled, which is cool because I have a small child and no free time. ;-)
Wednesday, March 21, 2012
Saturday, January 28, 2012
Viola Purfling
I recently cut the purfling channel in the maple back. I purchased the purfling from International Violin company.
I cut the channel using an Ibex perfling marker, a utility knife and a perfling pick from Diefenbacher tool.
Below is the Ibex purfling marker.
I set the marker about 4mm in from the edge and put a piece of purfling between the blades to set the width. This worked out great. I am starting to mark the spruce, but the end grain seems to be falling off. I am going to search the web for ideas.
Thursday, November 24, 2011
Viola arching and plate graduating
The last few days i have been completing the arching in both the top plate as well as the maple back. Below are some photos.
The back plate is on my impromptu carving jig.
This is the ribs sitting on top of the back.
This is a view of the arching of the back. I made a number of arching templates based on the Amati poster. I also made a arching gauge to see how the arching looks and how even it is for lack of better words.
Monday, October 24, 2011
More Finger Plane fun
So I ended up highly modifying my plane. I rounded the sole and made a brass wedge. I tapped an 8-32 hole and put in a pan head screw. Works great!! I will probably make a few more in different sizes.
Here is an updated picture of my 3 planes.
Sunday, October 9, 2011
Finger planes
Inorder to do much of the shaping of the plates I needed to make some finger planes. I used hard maple for the insole. The sides/rails were made of walnut scraps that I had around from making the backsaw.
The finger plane pictured below was my first attempt. It cuts well, but I needed to refine the design.
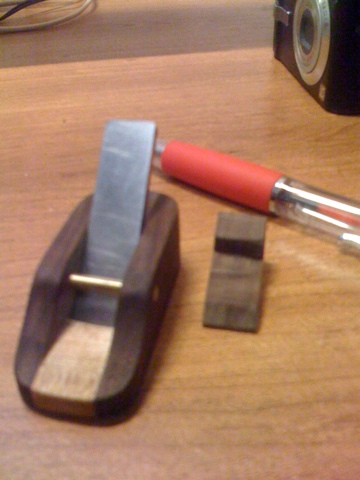
Below is my second attempt. I gave this one an oval outline. For both planes I reused a 1/2" chisel that I cut the blade off. Photos are a little blurry because I took them with my iPhone. The red pen is there to give a sense of scale.
Wednesday, October 5, 2011
Top plate
Cut my outline from the spruce I bought from old world tonewood. Loads of work left to do.
I amusing the Amati bros poster as a guide for the arching. I have made templates for the arching from the back of the poster. After completing arching in the next 2 weeks, I will start graduating the top.
The Spruce was purchased from Old World Tonewood. The logo can be seen on the top plate.
I amusing the Amati bros poster as a guide for the arching. I have made templates for the arching from the back of the poster. After completing arching in the next 2 weeks, I will start graduating the top.
The Spruce was purchased from Old World Tonewood. The logo can be seen on the top plate.
Monday, September 26, 2011
Viola scroll
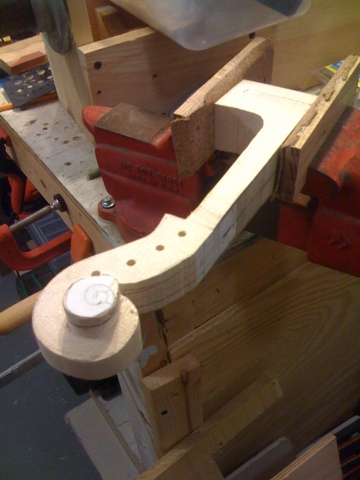
I started cutting and carving the scroll and neck to the viola. Here are some shots. It is a maple neck, as is standard. I am designing for a 148mm neck, with about 10-12mm overstand. The scroll is from the strad poster of the 1620 Amati viola.
I basically took the sketch from the back of the poster, scaled it to size and used it as a guide for where to cut. I will have to clean this up with gouges and scrapers.
Wednesday, June 15, 2011
Amati 1620 Viola
Sunday, June 5, 2011
Ready to attach top and back!!! And Completion
At this point I am itching to complete this thing. I made a plywood mold and used it and some adjustable cauls to do the work. I ordered this crazy bag of rubber bands to us as clamps.
Mold and Caul

Top and back

Glue up:


I removed the Mold... Now I attached the lining... could of done a better job in some parts. first time I used this type of lining.

Time to glue up the perfling on the top. I routed the channel using a el cheapo laminate trimmer.


Now the back is glued on, and so is the maple binding:
hey give that back...


Here the neck and fret board is attached and ready for finishing:


And I am finished:

Notes:
I set the action at the 12th fret to about .1". When doinf this I had a Capo on the fist fret.
Mold and Caul
Top and back
Glue up:


I removed the Mold... Now I attached the lining... could of done a better job in some parts. first time I used this type of lining.
Time to glue up the perfling on the top. I routed the channel using a el cheapo laminate trimmer.
Now the back is glued on, and so is the maple binding:
hey give that back...

Here the neck and fret board is attached and ready for finishing:
And I am finished:
Notes:
I set the action at the 12th fret to about .1". When doinf this I had a Capo on the fist fret.
Fox Style bender
So I got a watlow silicon heat blanket and started wiring up a temperature controller, then said screw this and took my thermo couple on my DM and used a power strip to turn on and off the blanket. I am the controller! I soaked the wood, covered it in tin foil and it worked great!!

You can see the temperature starting to rise on the DMM.

You can see the temperature starting to rise on the DMM.
| From Ukulele |
Saturday, February 19, 2011
Back bracing
Thursday, February 10, 2011
Tenor Ukulele
Cut out the rough shape for my Ukulele using a template I made from plywood and adding an extra bit of material around the outline. i also marked out my bracing and bridge plate.
Here is the top:

here is the back:

I also shaped the sides tapering from 3" to 2.5". I measure about 18" per side, so I added an extra 0.5".
Here is the top:
here is the back:
I also shaped the sides tapering from 3" to 2.5". I measure about 18" per side, so I added an extra 0.5".
Thursday, February 3, 2011
Got distracted..... Now time for a Ukulele
So I decided I would start building a tenor Ukulele from scratch....
I picked up imbuia for the backs and sides:
http://www.taylorguitars.com/guitars/features/woods/images/imbuia_back.jpg
I picked up wood from RCTONEWOODS.com, and have begun work. The fretboard is fretted, and I finished jointing the back and top. I created a plexiglass template as well.
RCTonewoods.com


Here is my back made from imbuia, after jointing and gluing, in the jig I made to join them.

I found the build manual for a Uke kit from www.stewmac.com and am using the plans from that, with some modifications of my own.
I picked up imbuia for the backs and sides:
http://www.taylorguitars.com/guitars/features/woods/images/imbuia_back.jpg
I picked up wood from RCTONEWOODS.com, and have begun work. The fretboard is fretted, and I finished jointing the back and top. I created a plexiglass template as well.
RCTonewoods.com
Here is my back made from imbuia, after jointing and gluing, in the jig I made to join them.
I found the build manual for a Uke kit from www.stewmac.com and am using the plans from that, with some modifications of my own.
Tuesday, April 6, 2010
Bridge mounting time
Tonight I installed the bridge. I used PVA glue, a Stewmac Bridgematic jig and a DIY bridge clamp.
First you measure the distance from the 12th fret to the nut:

Now flip the jig, and the little pointers at the end lineup with the front end of the saddle slot:

bridge located and end 2 holes drilled:

DIY clamp for the bridge:

Under the clamp
First you measure the distance from the 12th fret to the nut:
Now flip the jig, and the little pointers at the end lineup with the front end of the saddle slot:
bridge located and end 2 holes drilled:
DIY clamp for the bridge:
Under the clamp
Subscribe to:
Posts (Atom)