Acoustic Guitar

This is my blog on building an acoustic guitar that my wife got me as a kit. Some of the parts came preassembled, which is cool because I have a small child and no free time. ;-)

Monday, September 26, 2011

Viola scroll

I started cutting and carving the scroll and neck to the viola. Here are some shots. It is a maple neck, as is standard. I am designing for a 148mm neck, with about 10-12mm overstand. The scroll is from the strad poster of the 1620 Amati viola.


I basically took the sketch from the back of the poster, scaled it to size and used it as a guide for where to cut. I will have to clean this up with gouges and scrapers.

Wednesday, June 15, 2011

Amati 1620 Viola

So.. I am going to try and make a Viola modeled after the Amati 1620 Viola.
I am going to use this Strad magazine poster I have of it as a model.


So off to make a mold I go.
This site has loads of good info.

http://www.platetuning.org/html/arching_and_thicknesses.html

Sunday, June 5, 2011

Ready to attach top and back!!! And Completion

At this point I am itching to complete this thing. I made a plywood mold and used it and some adjustable cauls to do the work. I ordered this crazy bag of rubber bands to us as clamps.

Mold and Caul


Top and back


Glue up:


I removed the Mold... Now I attached the lining... could of done a better job in some parts. first time I used this type of lining.


Time to glue up the perfling on the top. I routed the channel using a el cheapo laminate trimmer.


Now the back is glued on, and so is the maple binding:
hey give that back...


Here the neck and fret board is attached and ready for finishing:


And I am finished:


Notes:
I set the action at the 12th fret to about .1". When doinf this I had a Capo on the fist fret.


Fox Style bender

So I got a watlow silicon heat blanket and started wiring up a temperature controller, then said screw this and took my thermo couple on my DM and used a power strip to turn on and off the blanket. I am the controller! I soaked the wood, covered it in tin foil and it worked great!!


You can see the temperature starting to rise on the DMM.


From Ukulele

Saturday, February 19, 2011

Back bracing

Finished the back bracing on the tenor Ukulele. Cut and shaped the braces from a billet of spruce. The spline was made from the excess soundboard material.


Now on to finishing the Fox style side bender.

Thursday, February 10, 2011

Tenor Ukulele

Cut out the rough shape for my Ukulele using a template I made from plywood and adding an extra bit of material around the outline. i also marked out my bracing and bridge plate.

Here is the top:


here is the back:


I also shaped the sides tapering from 3" to 2.5". I measure about 18" per side, so I added an extra 0.5".

Thursday, February 3, 2011

Got distracted..... Now time for a Ukulele

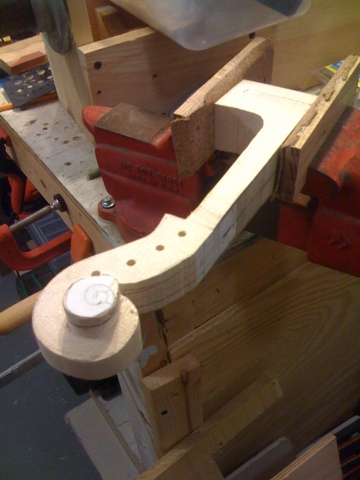
So I decided I would start building a tenor Ukulele from scratch....
I picked up imbuia for the backs and sides:

http://www.taylorguitars.com/guitars/features/woods/images/imbuia_back.jpg

I picked up wood from RCTONEWOODS.com, and have begun work. The fretboard is fretted, and I finished jointing the back and top. I created a plexiglass template as well.

RCTonewoods.com


Here is my back made from imbuia, after jointing and gluing, in the jig I made to join them.


I found the build manual for a Uke kit from www.stewmac.com and am using the plans from that, with some modifications of my own.