Acoustic Guitar

This is my blog on building an acoustic guitar that my wife got me as a kit. Some of the parts came preassembled, which is cool because I have a small child and no free time. ;-)

Friday, January 29, 2010

Clamps, clamps and more clamps

I finally cut all of the wood I needed to make the balance of the spool clamps. See the pile next to the guitar. Only 13 more clamps to go. Also I started dry fitting the top to the body and double checked the C clamp I have for clamping the top of the guitar.


Monday, January 25, 2010

Zen and the art of acoustic guitar binding

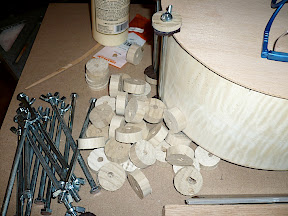
No photos tonight. Still building spool clamps. I should complete 7 or so tonight.

So, tonight I started thinking about the specifics of doing the binding. I asked some questions to Steve Summerford @ http://acousticguitarbuild.blogspot.com/ and he had lots of good recommendations.

If I do decide on the hardwood binding I am going to have to come up with a way to bend it. The DIY bending jigs seem like an easy option as I have a few torches around. Steve's blog had recommended soaking the wood in warm water for 30 min. This might be the no additional jig way to go. Heck, I think I am getting tired of making jigs.... nah.

Then I am probably going to attach with CA glue. And heck it will scrape off easily when I am done.

I was recommended to use drafting tape to attach the binding as I go along.

My other option is the black plastic stuff. I don't have to bend that. same attachment methods though.


The wood glue method seems like you can easily go wrong if you get the glue all over the place.


For those of you unfamiliar here is a diagram from Stewmac:


and a good article here on how to:
Here

Wednesday, January 20, 2010

Binding jigs and current status

I finished 10 spool clamps so far out of the 30 I think I will require. only 20 more to go... woo hoo. ;-)
I ran out of self adhesive felt today, so that slowed me up. I also started thinking about what type of jigs I will need for routing my binding channel, as well as the perfling channel.

To my disposal I have a regular table mounted router, laminate router, as well as a Dremel with a router base.

I was thinking about this one at stewmac:


Although this one looked really cool as well:


The dremel router base I have:


Maybe this one as a DIY:


This is not a bad idea for another DIY jig.

Braces

I just shot off a quick e-mail to USGUITARKITS.com with a questions about shaping the upper X Braces. The instructions they give have 2 templates for the lower X Braces, but none for the upper X Braces.

They replied quickly by letting me know that the template for Lower X Brace on the right hand side of their template page was mislabeled and should read Upper X Brace. They also said the manual will be getting an update and posted on the website.

Tonight I fit the top of the guitar to the back and everything lines up great. Just a little cleanup work on the braces and I should be band-sawing some of the excess off the top and gluing the top to the sides. This is my plan for next week. But first I must complete making the spool clamps I had started. I completed a few, now to drill and felt the rest.

I was also contemplating replacing the plastic binding and perfling in the kit with:
Binding Laminated Rosewood:

Perfling:

Images from Stuart Macdonald http://www.stewmac.com

Tuesday, January 19, 2010

More brace work

Back to the guitar. No tool building tonight.
;-)


I had to set up my router to get the ends f the braces to an equal height. I also trimmed the pockets in the kerfed lining for the shoulder and X braces to sit on.

The photo below is how I rigged the router, by drilling a hole through the yellow plastic and mounting to the oak rails of my shooting board using a screw. I then se the bit to about 3/16 above the guitars soundboard.


kerfed lining cutting:


My guitar inscription:


Let me know if you can guess what it means. Also if you took Latin, let me know if my conjugation is correct.

Sunday, January 17, 2010

Backsaw

Here is a photo of the heirloom Backsaw I just built. I followed an article from Shop Notes Magazine.
I cut EVERY tooth by hand. There are a boat load of teeth on a saw.....

This was enough of a distraction, now back to my guitar.


http://www.shopnotes.com/issues/109/sources/heirloom-back-saw/

Monday, January 11, 2010

Inlay

Just saw a great video on doing inlay on an Acoustic guitar.


Hmm.....

I updated this post on 1/30/2010 to provide some links to inlay suppliers:
www.luthiersupply.com

Here they provide a good intro to inlay here
As well as some info on making a tool:


Here is a link to some tools for sale such as the dental bur: here

Friday, January 8, 2010

Book

Just picked up "Guitar Making" by Cumpiano/Natelson. Very comprehensive.

I already read about half the book.


Guitarmaking-Tradition-Technology-Construction at Amazon.com

Also got distracted building a heirloom backsaw.

Wednesday, January 6, 2010

Shooting Board

Shooting Board Completed:


This was very helpful as a good work surface. I used MDF as a base and oak as rails.
Then I started carving the finger braces and tone braces.

Tuesday, January 5, 2010

Tone Braces

Well...... I found out tonight I will need to make a shooting board. I was carving the tone braces, slipped and hit my floor with the chisel. requiring a resharpening of the chisel and a mad look on my face.

A shooting board similar to this should work:


photo from http://acousticguitarbuild.blogspot.com/2008/06/building-soundboard.html


I have some spare MDF in my basement as well as some spare hardwood.

here is a good article on scalloping tone braces:
http://www.frets.com/FRETSpages/Musician/Guitar/SclpBraces/sclpbrace1.html

Monday, January 4, 2010

Tools

I just made some templates for carving the braces based on the recommendations in the manual.

Soundboard with uncarved braces:


Brace templates:


I have stared making spool clamps for when I need to glueup the top to the sides. Went to Home Depot and bought the biggest diameter hardwood dowel they have and some self adhesive felt. Also bought some 1/4" x 6" bolts and 1/4" wing nuts. I cut the dowel into 1/2" sections and applied the adhesive felt to one side. drilled a 1/4" hole through the combo and attached the bolt through a pair and capped it off with a wing nut.


Very similar to these from Stew Mac:


www.stewmac.com


Also,
I have a Router and a Dremel, and am looking for any good recommendations for which is best for cutting the recess for the binding and the purfling.

Step One getting started

Just received an Acoustic Guitar Kit from my wife for my 35th birthday. I am super excited to start this thing. She picked it up from www.usguitarkits.com. It has a Cedar top and highly figured sycamore back and sides.


US Guitar Kits

So I opened the package and it comes with some instructions as well as some of the work pre done for you. This is great as I have a 19 month old and my time is super limited. This is my first attempt, so anything that helps success is welcome.


I came across this blog, which is super helpful and I recommend reading it:

http://acousticguitarbuild.blogspot.com/2008/06/introduction.html

I'll be back next time with some progress.